 how-to
Tips for Thick Creamy Açai Bowls: A How-To Guide
Table of Contents
- Why Your Açai Bowl Turns Into a Smoothie
- Essential Ingredients for Thick Bowls
- Mastering the Liquid-to-Solid Ratio
- How to Blend Frozen Açai Packets Correctly
- Step-by-Step Preparation Guide
- Açai Bowl Topping Ideas for Texture and Flavor
- Common Mistakes When Making Thick Açai Bowls
- Conclusion
Last Updated: August 26, 2026
Why Your Açai Bowl Turns Into a Smoothie
The biggest mistake people make when preparing thick creamy acai bowls is treating the process like a regular smoothie. They dump frozen fruit, liquid, and toppings into a blender and wonder why they end up with something that tastes more like a drink than a bowl.
The problem isn't the ingredients, it's the technique. A proper thick creamy acai bowl requires precision in three areas: the ratio of frozen fruit to liquid, the type of liquid you choose, and how you blend it. Skip any one of these, and you'll end up with a consistency that's too thin to eat with a spoon.
World Green Açai uses authentic açai from Northern Brazil and has perfected this balance. The difference between a watery disappointment and a genuinely thick, creamy bowl comes down to understanding why consistency matters: it's about how the ingredients emulsify, how temperature affects viscosity, and how your blender's power influences the final result.
Essential Ingredients for Thick Bowls
The Importance of Frozen Fruit
Frozen fruit is non-negotiable for achieving the ice-cream texture that defines a proper thick creamy acai bowl. Fresh fruit will make your bowl watery no matter what else you do. When you freeze açai, banana, mango, or berries, the water inside crystallizes. This means when you blend frozen fruit, you're creating a dense, creamy base through mechanical action rather than adding liquid.
Pre-frozen açai packets are your best starting point. These are typically flash-frozen at peak ripeness, which preserves the antioxidants and flavor better than home-freezing (peer-reviewed research). If you're working with fresh fruit, freeze it solid for at least 6 hours before blending. Partially frozen fruit will still yield a thin consistency.
The combination of frozen fruit types matters too. Frozen açai packets form the base, but adding frozen banana increases creaminess through natural emulsification. Frozen mango or berries add flavor and texture without thinning the bowl if you maintain proper ratios.
Choosing the Best Liquid for Açai Bowls
Not all liquids create the same results in thick creamy acai bowls. The type of liquid you choose affects both the final consistency and the flavor profile.
Coconut milk is the gold standard for thickness. Full-fat coconut milk has higher fat content, which creates richer emulsification with the frozen fruit (fsis.usda.gov). This means less liquid is needed to achieve a blendable consistency, resulting in a thicker final product. Coconut milk also complements the natural flavor of açai without competing with it.
Nut milks like almond milk or cashew milk work well but require slightly more careful ratios. Cashew milk tends to create smoother emulsification than almond milk because of its higher fat content. Avoid dairy milk if you're aiming for maximum thickness, as it doesn't emulsify the same way plant-based liquids do. Water is the enemy of thick consistency, it just dilutes the mixture without helping bind the frozen fruit together.
Mastering the Liquid-to-Solid Ratio
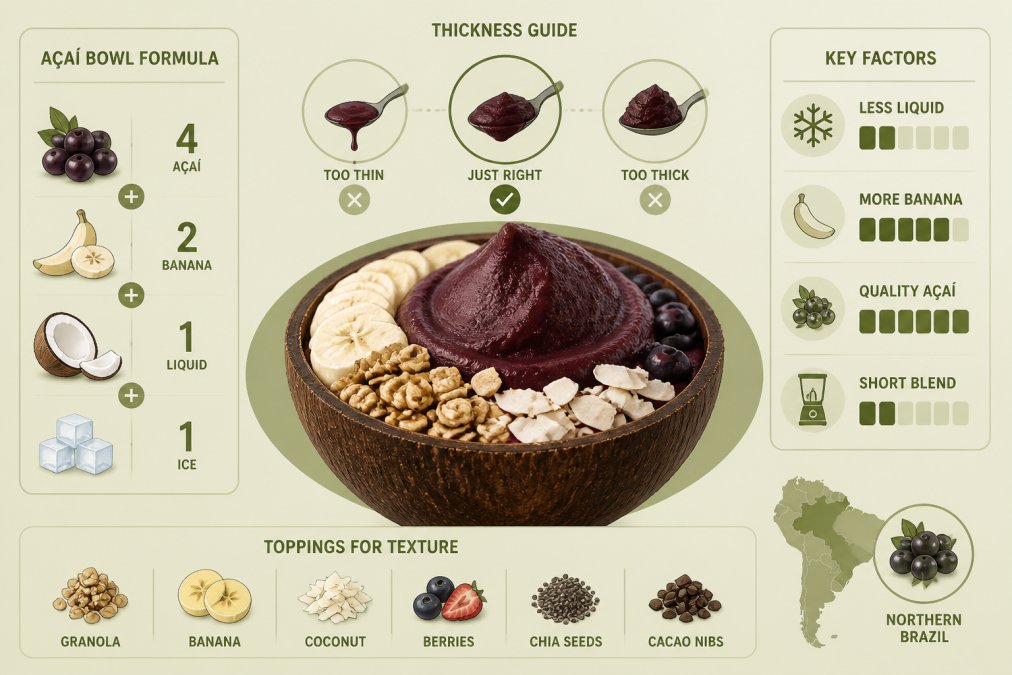
The liquid-to-solid ratio is the single most important factor in achieving thick creamy acai bowls. The ideal starting ratio is approximately 1 part liquid to 4-5 parts frozen fruit by volume.
For a standard bowl, this typically means:
- 1 frozen açai packet (100g)
- 1/2 to 3/4 frozen banana
- 1/4 cup coconut milk (maximum)
- Optional: 1/4 cup additional frozen fruit (mango, berries)
Adding just 1/4 cup more liquid than recommended will noticeably thin your bowl. Adding 1/2 cup extra will turn it into a smoothie.
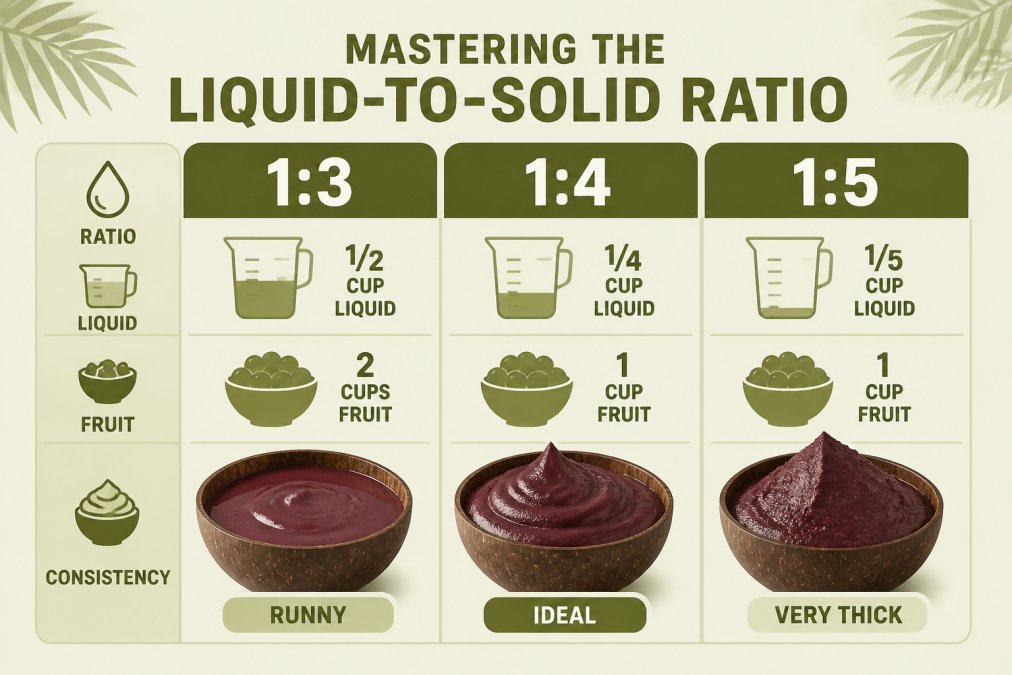
Start with the 1:4 ratio. If your blender struggles to process the mixture, add 1-2 tablespoons of liquid at a time until it blends smoothly. This approach prevents over-thinning while ensuring your blender doesn't burn out. Temperature management affects how you perceive thickness, a bowl served immediately after blending will feel thicker than the same bowl after sitting for 5 minutes at room temperature.
How to Blend Frozen Açai Packets Correctly
Blending frozen açai packets requires a different approach than blending softer frozen fruits. Açai packets are dense and resistant to breaking down, which is actually an advantage for creating thickness, but only if you use the right technique.
Start by breaking the açai packet into chunks before blending. Don't try to blend a solid frozen brick. Cut or break the packet into 4-6 pieces. Layer your ingredients strategically: put the liquid in the blender first, then add the broken açai pieces, then add softer frozen fruits like banana on top. This layering helps the blender process the dense açai more efficiently.
Blender Techniques and Troubleshooting for Low-Power Models
High-speed blenders (1,500+ watts) make this process easy, but standard blenders in the 500-1,000 watt range require adjusted technique. For low-power blenders, reduce the total volume slightly, instead of making one large bowl, make two smaller portions. This reduces strain on the motor and gives the blades more room to work effectively.
Use the pulse setting instead of continuous blending. Pulse for 3-5 seconds, stop, stir with a tamper tool or spoon, then pulse again. Most blending happens in the first 10-15 seconds; additional blending time just creates a thinner consistency as the mixture warms.
If your blender has a "smoothie" or "frozen" setting, use it. These settings typically run at lower speeds with periodic pulses, which is ideal for this task. For blenders that struggle with frozen fruit, let the packets sit at room temperature for 2-3 minutes before blending. This softens them slightly without fully thawing them. If your blender is making a grinding noise or not progressing after 15 seconds of pulsing, stop immediately and add 1-2 tablespoons of liquid.
Step-by-Step Preparation Guide
Making thick creamy acai bowls consistently requires following a specific sequence. This process takes about 5 minutes total.
Step 1: Prepare Your Ingredients (1 minute) Remove your frozen açai packet from the freezer and let it sit for 2-3 minutes. Break it into 4-6 manageable pieces. Measure out your liquid (1/4 cup maximum) and gather any additional frozen fruit. Pre-freeze your serving bowl in the freezer for 2 minutes.
Step 2: Layer in the Blender (1 minute) Pour your measured liquid into the blender first. Add the broken açai pieces. Top with frozen banana slices or other frozen fruit. This layering order helps the blender process the dense açai effectively.
Step 3: Blend Using Pulse Technique (2-3 minutes) Start with 3-5 second pulses. Stop and check consistency. The mixture should look thick and hold together, not pourable. If it's still too thick to blend, add 1 tablespoon of liquid and pulse again. Most bowls need 4-6 pulses total. Stop as soon as the mixture reaches a thick, creamy consistency.
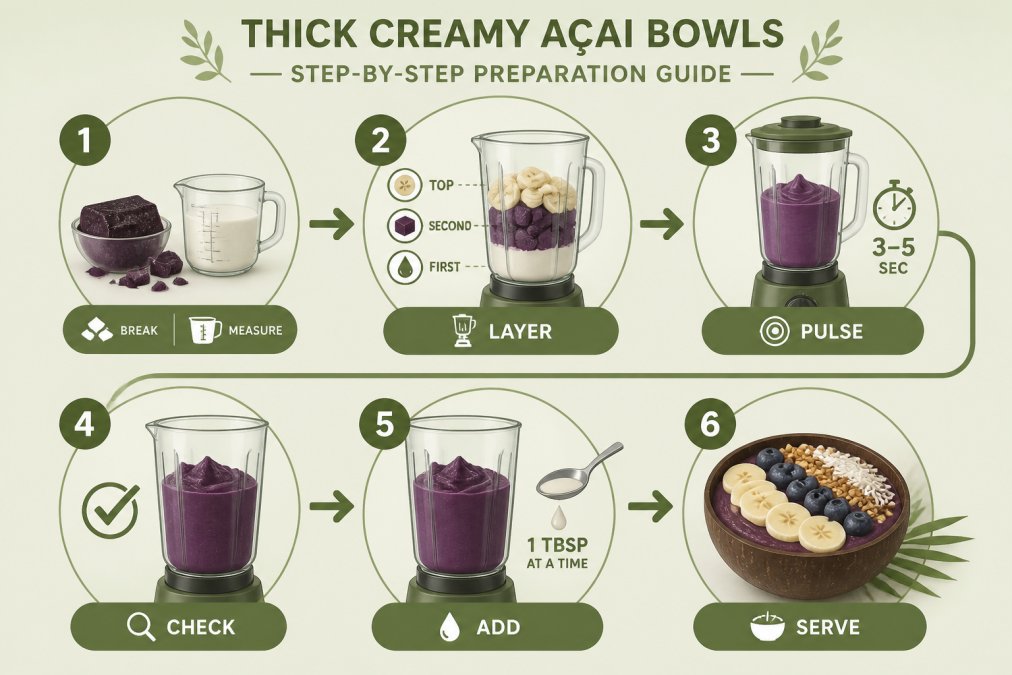
Step 4: Check and Adjust Consistency (30 seconds) Pour a small amount into your serving bowl to test. It should hold its shape and require a spoon to eat, not a straw. If it's too thin, you've over-blended or used too much liquid. If it's too thick to pour, add 1 tablespoon of liquid and pulse once more.
Step 5: Transfer to Serving Bowl (30 seconds) Pour the blended mixture into your pre-chilled bowl. Work quickly, every second at room temperature reduces thickness slightly.
Step 6: Add Toppings Immediately (1 minute) Add your toppings while the bowl is still cold and thick.
Açai Bowl Topping Ideas for Texture and Flavor
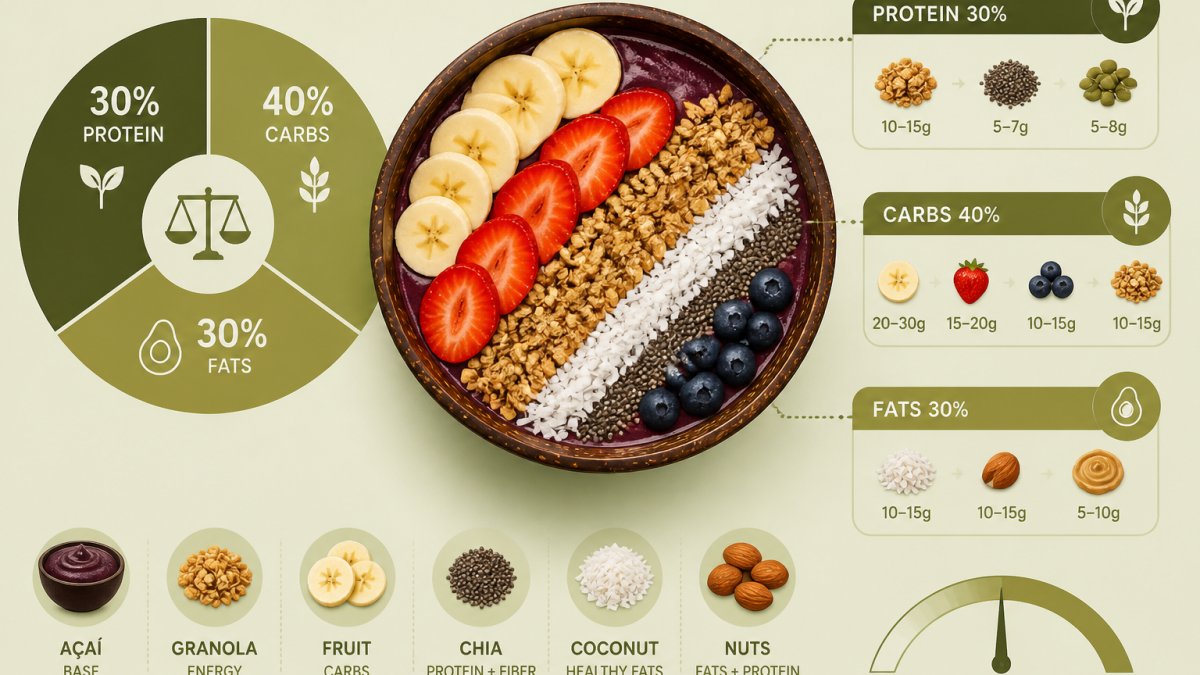
Toppings do more than add flavor; they affect how your thick creamy acai bowl is perceived and eaten. Granola is the foundation topping, providing crunch and visual interest. Use about 1/4 cup per bowl. Fresh berries add brightness and acidity that balances the richness of the thick base, use about 1/4 cup per bowl.
Coconut powder or shredded coconut adds texture and reinforces the coconut milk base. A light sprinkle (about 2 tablespoons) provides enough texture without overwhelming the bowl. Nut butters drizzled over the top add richness and protein, use about 1 tablespoon per bowl. Sliced fresh fruit like banana, mango, or kiwi adds visual appeal and freshness. Honey or maple syrup drizzled lightly adds sweetness, a thin drizzle (about 1 teaspoon) is enough.
The key to topping strategy is balance. You want enough toppings to add interest and texture, but not so many that they overwhelm the thick creamy base. A well-topped bowl should still be mostly visible açai, with toppings distributed across the surface.
Common Mistakes When Making Thick Açai Bowls
Understanding what goes wrong helps you avoid repeating the same errors.
Too Much Liquid from the Start This is the number-one reason bowls turn out thin. Start with 1/4 cup maximum for a standard bowl. You can always add more, but you can't remove it.
Using Fresh or Partially Thawed Fruit Fresh açai, fresh banana, or even partially thawed frozen fruit introduces water into the mixture. Frozen fruit is essential and non-negotiable.
Over-Blending Blending for more than 15 seconds typically over-processes the mixture, warming it slightly and creating a thinner consistency. Use the pulse technique and stop as soon as the mixture is blended.
Choosing the Wrong Liquid Water, low-fat milk, or thin plant-based liquids make thickness harder to achieve. Coconut milk or cashew milk are your best options.
Not Serving Immediately Every minute at room temperature reduces thickness. Prepare your bowl and eat it within 2-3 minutes of blending for maximum thickness.
Inconsistent Ingredient Ratios Making bowls "by feel" instead of measuring leads to inconsistent results. Measure your liquid precisely and your frozen fruit by volume.
Achieving thick creamy acai bowls at home is entirely possible once you understand the mechanics of frozen fruit, liquid ratios, and blending technique. Start with frozen ingredients, respect the 1:4 liquid-to-solid ratio, blend using pulse technique, and serve immediately.
World Green Açai brings this precision to every bowl, using authentic açai from Northern Brazil and maintaining exact ingredient ratios that create the ice-cream texture you're looking for. We use coconut bowls and real açaí in every preparation. If you want to experience thick creamy acai bowls without the trial and error, order online through the World Green Açai app and skip the guesswork. Each bowl is prepared with the same attention to consistency that we've outlined here: frozen fruit, measured liquid, and immediate serving.
For those committed to making bowls at home, remember this: the thickness you want is achievable with the right technique. Start with less liquid than you think you need, use frozen fruit exclusively, and pulse your blender rather than running it continuously. These three changes will transform your results.
Frequently Asked Questions
Q: How do I get an açai bowl thick instead of runny?
A: The key is using a 1:4 or 1:5 liquid-to-fruit ratio and keeping your liquid minimal. Pre-freeze your bananas and other fruit, use a high-speed blender on pulse setting, and avoid over-blending. Temperature management matters too, keep your açai packets frozen until the last moment, and serve immediately. If your bowl still seems thin, add a thickener like coconut powder or chia seeds before blending.
Q: What's the best liquid for açai bowls?
A: Nut milk (almond or coconut) works best because it adds minimal liquid while providing creaminess. Coconut milk creates the richest texture but can overpower the açai flavor. Avoid regular milk or juice, which add too much liquid and dilute the superfood taste. Start with just ¼ to ½ cup of nut milk per bowl and adjust based on your blender's power and your desired viscosity.
Q: Why does my açai bowl turn into a smoothie?
A: You're likely using too much liquid or blending too long. High-speed blenders can over-process the mixture, breaking down frozen fruit too quickly and releasing excess moisture. Use the pulse setting instead of continuous blending, add liquid sparingly, and blend for only 30-45 seconds. If your blender is low-power, add liquid even more conservatively and use frozen banana as your primary thickener.
Q: How long should I blend an açai bowl for the right consistency?
A: Blend on pulse setting for 30-45 seconds maximum. Start with 20-30 seconds, check the consistency, then pulse in short bursts until you reach ice-cream-like texture. Over-blending breaks down the frozen fruit structure and releases moisture, making your bowl thinner. With high-speed blenders, 30 seconds is often enough; low-power models may need the full 45 seconds. Stop as soon as the mixture holds its shape.
This article was written using GrandRanker